
Why this blog?
This blog section delves into Snowpipe’s pivotal role in automating cloud data ingestion within Snowflake. While detailing its features, it emphasizes the critical importance of staying updated on upcoming features. Learning about these advancements ensures preparedness for enhanced security measures, collaborative analytics, and advanced machine learning integrations, crucial for maintaining a competitive edge.
Automating Cloud Data Ingestion with Snowpipe
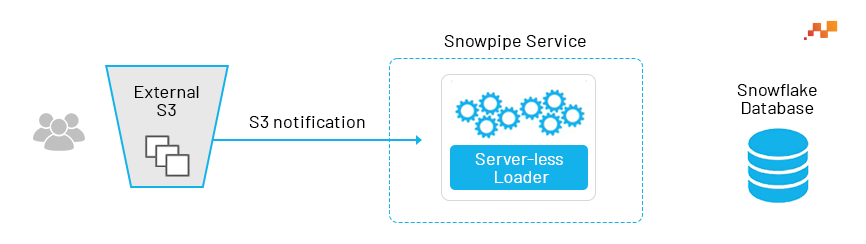
Today, let us will discuss Snowpipe, a very important feature of the cloud data engineering and warehousing platform, Snowflake. This feature allows you to automatically load data as soon as files appear in a particular bucket. When new files are added to the bucket, they are automatically loaded into the specified table. This is especially important when it comes to transactional or event data that you want to be readily available for analysis.
Using SnowPipe to automatically fetch new data as soon as it appears in a particular bucket is a typical use case, also known as a ‘serverless function’. This means that instead of utilizing a virtual warehouse, computing resources are managed by Snowflake itself. Hence, there’s no need to worry about virtual warehouses in this scenario.
Suppose you have a specific bucket, and you can manually copy data from that bucket to your table. However, SnowPipe can automatically detect when a file is loaded or placed into that bucket. Just get that notification and you can set up an event notification to trigger SnowPipe.
Setting up Snowpipe
1) Create Stage
First step is to create a stage object. This includes the connection and location to the external stage to copy the data. After that, we need to create a copy command. We recommend that you also test this copy command after creation.
You can then create a pipe containing this copy command definition. Before using the COPY command in a Snowpipe definition, you should ensure that the COPY command runs successfully and correctly. A stage can be an S3 bucket or an Azure Blob where streaming data arrives continuously.
// Create table first

CREATE OR REPLACE TABLE SNOW_DB.PUBLIC.employees (

id INT,

first_name STRING,

last_name STRING,

email STRING,

location STRING,

department STRING

);

// Create file format object

CREATE OR REPLACE file format DATABASE.file_formats.csv_fileformat

type = csv

field_delimiter = ','

skip_header = 1

null_if = ('NULL','null')

empty_field_as_null = TRUE;

// Create stage object with integration object & file format object

CREATE OR REPLACE stage DATABASE.external_stages.csv_folder

URL = 's3://snowflakebucket/csv/snowpipe'

STORAGE_INTEGRATION = s3_int

FILE_FORMAT = DATABASE.file_formats.csv_fileformat;

// Create stage object with integration object & file format object

LIST @DATABASE.external_stages.csv_folder;

// Create schema to keep things organized

CREATE OR REPLACE SCHEMA DATABASE.pipes;
2) Create Pipe
We need to create a pipe and name the pipe as Employee. After creating a pipeline, it’s still not operational. We need to configure notifications and receive files to initiate the copy process.
// Define pipe

CREATE OR REPLACE pipe DATABASE.pipes.employee_pipe

auto_ingest = TRUE

AS

COPY INTO SNOW_DB.PUBLIC.employees

FROM @DATABASE.external_stages.csv_folder ;

// Describe pipe

DESC pipe employee_pipe;

SELECT * FROM SNOW_DB.PUBLIC.employees ;
AWS Data Engineering Essentials Guidebook

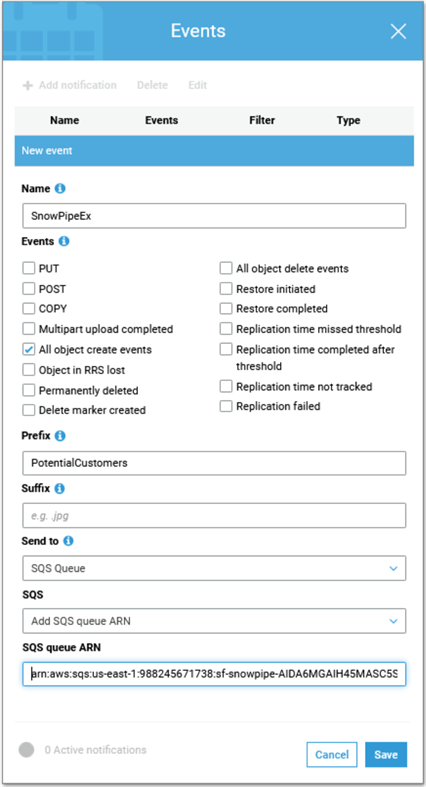
3) Configure Notifications
There are a couple of ways to trigger a pipe to continuously load data.
- Configure events via cloud platform: This will trigger the pipe when new files arrive. When the event occurs, the associated pipe is also fired to load the data into the target table. This is the preferred option as it is less hassle and more robust than the alternative method.
- Trigger Snowpipe using the REST API: Write a custom program that you can run whenever you want Snowpipe to load.
4) Manage Pipes
After setting up the pipeline, it’s crucial to handle operations like pause, resume, refresh, list files in steps, check for a paused channel with PendingFileCount 0, and recreate channels to modify the COPY command in the definition. Additionally, ensure checks for the running status of channels.
// Preparation table first

CREATE OR REPLACE TABLE SNOW_DB.PUBLIC.employees2 (

id INT,

first_name STRING,

last_name STRING,

email STRING,

location STRING,

department STRING

);

// Pause pipe

ALTER PIPE DATABASE.pipes.employee_pipe SET PIPE_EXECUTION_PAUSED = true;

// Verify pipe is paused and has pendingFileCount 0

SELECT SYSTEM$PIPE_STATUS('DATABASE.pipes.employee_pipe') ;

// Recreate the pipe to change the COPY statement in the definition

CREATE OR REPLACE pipe DATABASE.pipes.employee_pipe

auto_ingest = TRUE

AS

COPY INTO SNOW_DB.PUBLIC.employees2

FROM @DATABASE.external_stages.csv_folder ;

ALTER PIPE DATABASE.pipes.employee_pipe refresh;

// List files in stage

LIST @DATABASE.external_stages.csv_folder ;

SELECT * FROM SNOW_DB.PUBLIC.employees2;

// Reload files manually that where aleady in the bucket

COPY INTO SNOW_DB.PUBLIC.employees2

FROM @DATABASE.external_stages.csv_folder;

// Resume pipe

ALTER PIPE DATABASE.pipes.employee_pipe SET PIPE_EXECUTION_PAUSED = false;

// Verify pipe is running again

SELECT SYSTEM$PIPE_STATUS('DATABASE.pipes.employee_pipe') ;
Real-Time Data Acceleration and Advanced ML Integrations
Snowpipe accelerates data loading by processing files in micro-batches, providing real-time access within minutes. Snowflake’s cloud-native design ensures scalability and concurrent access with features like multi-cluster and shared data architecture. Automatic optimization streamlines data warehouse management and ensures efficient query performance.
Upcoming features of cloud data engineering Snowflake is looking to strengthen security measures, enhance data sharing capabilities, and foster collaborative analytics. Snowflake is set to introduce advanced machine learning integrations, improved support for semi-structured data, and expanded real-time analytics capabilities to adapt to our evolving data needs.
FAQ’s
Can SnowPipe handle complex data formats beyond simple CSV files?
SnowPipe excels at handling various data formats besides CSV. It seamlessly integrates with Snowflake’s support for structured, semi-structured, and even nested data formats like JSON and Avro. This flexibility allows you to ingest data from diverse sources without needing additional data transformation steps before loading.
How can I ensure efficient data loading performance with SnowPipe?
Optimizing SnowPipe performance involves a few key strategies:
- Data Partitioning: Organize data in the external stage based on logical partitions (e.g., date, region). This enables parallel loading with multiple COPY commands, speeding up data ingestion.
- File Sizing: Consider splitting large data files into smaller chunks (ideally 10MB-100MB). This improves processing efficiency and reduces load time.
Compression Options: Utilize compression techniques like Gzip or Snappy during data transfer to the stage. Smaller file sizes translate to faster loading times for SnowPipe.
What are the future possibilities of SnowPipe in the context of evolving data needs?
SnowPipe is constantly evolving alongside Snowflake’s platform. Here are some anticipated advancements:
- Enhanced Stream Processing: Future iterations might see tighter integration with streaming data sources, enabling near real-time data ingestion without needing files.
- Machine Learning Integration: Potential integration with machine learning services could allow for automated data cleaning and transformation within SnowPipe pipelines.
Expanded Data Source Support: Broader support for various data sources beyond cloud storage platforms might be introduced, providing even greater flexibility for data ingestion.
Comments

The Future of Medallion Architecture with Snowflak...

Smarter Healthcare Analytics with Snowflake and Ic...

Serverless Computing in Snowflake...

A Complete Guide on Security and Compliance in Sno...

Enhancing Data Processing with Aggregate Functions...

Streamline SQL Workflow with Snowflake Copilot...

GCP vs. AWS vs. Azure (2024)...
Databricks vs. Snowflake (2024)...
Quick Tutorial on DataFrame Updates in Snowpark...

Leave a Comment